MZ-1P01 printer / plotter
( Operating instructions )
|
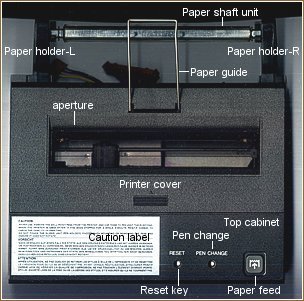
| The elements of the plotter. |
|
| Inserting and removing paper |
-
Remove the cover.
-
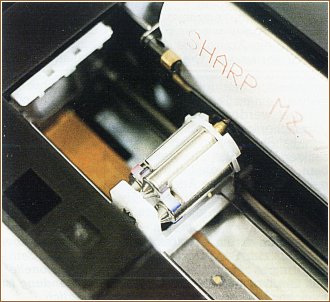
Cut paper straight if necessary and put it into the paper feed
supply at the reverse side of the plotter ( see the following picture
). Make sure that the paper doesn't knit thereby.
Use the paper feed key until the paper is approx. 3 to 5 mm over
the outlet.
-
Put the paper shaft unit into the web and lock it carefully into
the paper holders ( inserting and removing the paper shaft unit
is a problem for me: Sometimes a paper holder gets broken... ;-)
-
Remount the printer cover whereby the paper is to place through
the aperture of this cover. That's all.
To remove the paper out off the plotter, cut the paper at the
entrance of the paper feed supply and remove the remaining paper in
the plotter by operating the paper feed key.
 Don't try to pull the paper backwards out off the plotter. This can
destroy mechanical parts of the plotter, I hardly know - I killed a
plotter by this... :-(
Don't try to pull the paper backwards out off the plotter. This can
destroy mechanical parts of the plotter, I hardly know - I killed a
plotter by this... :-(
|
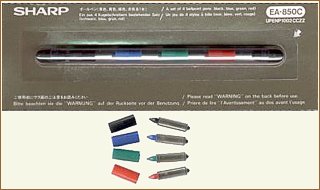
Use specified roll paper only: MZ-6P05 and keep it at a moistureless
place. Never use a different one than the prescribed paper.
|
|
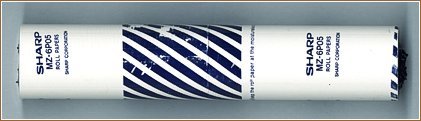 |
The paper length may amount between 23 and 25 meters, the max. role
diameter may 50mm amount to ( width of a role 114mm; paper about 0.1mm
). With larger diameters a line feed is no longer ensured correctly.
The result is a bad print quality.
|
| Pen exchange method |
-
Remove the cover of the plotter.
-
Operate the PEN CHANGE button by a normal ball-point pen, not plotter's
ball-point pen. Thus the print head moves to the right.
When the slider is at the right handside, push the pen release
lever. At the same time put a finger on the ball-point pen, so that
it can't fall after ejecting into the plotter.
-
To install the pen, push the tip of the pen through the ring of
the return spring in the first place, then push into the holder.
Upon completion, ensure that the tip of the pen is engaged with
the hole of the pen returning spring.
-
If colour change is done when the pen is disengaged from the hole,
it may cause improper rotation of the rotary holder as the slider
makes contact with the pen. Do not try to rotate the rotary holder
by hand when installing the pen during replacement of the pens ( ever
use the pen change button for inserting the next ball-point pen !
).
-
Press the pen release lever again, in order to turn the next ball-point
pen upward.
-
Exchange all ball-point pens at the same way. Occurred, operate
the RESET key by a normal ball-point pen. The plotter is set thereby
in its readiness status ( ready condition ).
-
By the basic instruction TEST or by the monitor command P&T
should be checked now, whether all ball-point pens operate correctly.
The
ink can smear if the paper becomes wet, because the ball-point pens
writes with water-soluble ink. Therefore, treat the paper carefully.
Caution: After use, remove the ball-point pens from the printer
and cap them to prevent their drying. When the printer is used after
it has been stopped for a while, execute PRINT/P CHR$(4) to check the
quality of printing.
Do not touch the slider unit ( pen holder ), except when mounting or
removing the pens and ensure it does not rotate.
|
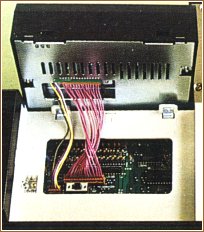
| Installing the color plotter MZ-1P01 ( all models
except MZ-731 ) |
-
Be sure that the MZ-700 and its peripheral units are turned off
before connecting the printer to the computer.
-
Remove the printer dummy cover ( MZ-711, MZ-721 ) by removing its
two screws at the computer rear.
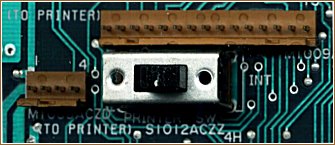
-
Set the printer selector switch on the motherboard to the INT position
( see the following pictures ).
- Connect the two cables into the appropriate sockets of the motherboard.
Consider the notches ( see the following picture ).
-
Mount the plotter with the screws remained by removing the printer
dummy cover. Before tightening, it must be guaranteed that no cable
was gotten caught between the plotter and both housings ( see picture
above ).
|
| Connecting an external printer |
|
You can attach the printer MZ-80P5(K) of the MZ-80K by a special cable
connection ( option ) without a special interface card to the MZ-700.
For the use of an external printer the printer selector switch must
be in the position "EXT " ( see pictures above ). Therefore, color plotter
and external printer can be used not at the same time.
If
programs output statements for the color plotter to the external printer,
the not available control characters will be printed.
Please take a kindly note of my Centronics
interface to use a Centronics printer with your MZ-700.
|
Plotter Self Test
written by Paul Trainer / Fred White SUC/UK
Source: SUC-magazine July 1992, Volume 12, Number 2, p. 52 |
|
Fred White tells us that there is a self test for the plotter. No doubt
others have stumbled across this feature, but it‘s a new one to
me. All you have to do is switch off, unplug the plotter from the main
board, but leaving the power plug connected. Whilst holding the paper
feed button, switch on and hey presto the plotter will print all the
characters stored in its brain.
|