| MZ-700 Centronics interface
( my own )
|
|||||||||||||||||||||||||||||||||||||||
| Description of the hardware | |||||||||||||||||||||||||||||||||||||||
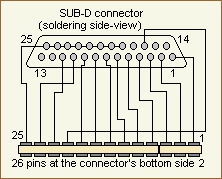
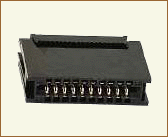
Next you have to assemble a flat cable with 13 wires to this connector. The marked side ( usually a red or a blue strip ) of the cable is to connect with pin 1 of the connector. To the free end of the cable a 25pins SUB-D female connector with housing is to be soldered as shown in the circuit diagram above. Don't forget to mount the housing before soldering the cable. :-) For this I rolled up the flat cable and I protected the flat cable against mechanical load ( breaks and so on ) with a small piece of spaghetti tubing. The cable is now ready to connect it to the printer connector of your MZ-700. The connector does not have a twist protection, therefore it must be paid attention always to the fact that the characterized vein of the flat cable is on the right when attaching from the rear. You can mark the plug to prevent confusion and errors. The printer selector switch in the MZ-700 must be switched now to external operation. The MZ-700 can serve either only the plotter or only the printer. An optional operation of plotter and printer can be attained therefore unfortunately only by switching of this switch. For this the MZ-700 must be opened and screwed on. You'll find this
switch nearby the connector for the plotter. For printer operation this
must be operated to its left position, if the keyboard is in
|
|||||||||||||||||||||||||||||||||||||||
| Description of the software | |||||||||||||||||||||||||||||||||||||||
| Using Mzprint.mzf for calls by your own program | |||||||||||||||||||||||||||||||||||||||
|
The software can be called by CALL $B800 in your own machine code programs. At first the byte to be printed must be loaded into the accumulator register. The first call to the program should be done by CALL $B803 to initiate and to reset the output port and the printer into the operating condition, otherwise the program cannot work properly. This call should be done first too after each RESET of the MZ-700. Afterwards the program can be called in each case by the address $B800. Do not call the program constantly by the initiation address $B803. Escape sequences sent will not take effect if you do. The printer is reset every time you call the program by $B803 and escape sequences sent may be lost. During a Busy status of the printer ( end of paper / back-up, power off, off-line and so on ) the program can be aborted by SHIFT+BRK. The program loops waiting for the ready status of the printer and in the meanwhile the break condition is checked too. The break condition is indicated to the caller by setting the zeroflag. Your own application can react to this condition if possible ( abort, message ). Example LD A,PRTBYTE ; load character to be printed CALL $B800 ; execute print JP Z,BREAK ; break condition The character to be printed is converted from the MZ specific code into the ASCII code if possible. |
|||||||||||||||||||||||||||||||||||||||
| Screen hardcopy by Hardcopy.mzf | |||||||||||||||||||||||||||||||||||||||
|
An example of an application is the hardcopy of the display output. The program can output a hardcopy both by a printer or by a plotter. For this the program is to be called by CALL $B000. A non-zero value is to be stored into $B004 to invoke a return to the caller at the end of the print program: LD A,$FF ; load a non-zero value
; into the accumulator
LD ($B004),A ; transfer the value
; to the print routine
CALL $B000 ; execute the print routine
If the storage at location $B004 contains $00 no return takes place, but it takes place a return to the monitor ROM. Thereby the program can output also a screenshot of the present screen contents by the monitor command JB000. You have to inform the print routine too if the output is to direct to the printer or to the plotter. Set $B003 to $50 if the output is to direct to the plotter, otherwise set $B003 to any other value: LD A,$FF ; load a non-zero value
; into the accumulator
; (return to me,
; don't return to Monitor)
LD ($B004),A ; transfer the value
; to the print routine
LD A,$50 ; load $50 for the plotter
LD ($B003),A ; transfer the value
; to the print routine
CALL $B000 ; execute the print routine
You can stop printing at any time by pressing SHIFT and BREAK coincidentally. If pressed, the zeroflag is set and your program can check this condition: LD A,$FF ; load a non-zero value
; into the accumulator
; (return to me,
; don't return to Monitor)
LD ($B004),A ; transfer the value
; to the print routine
LD A,$49 ; load $49 to output to the printer
LD ($B003),A ; transfer the value
; to the print routine
CALL $B000 ; execute the print routine
JP Z,BREAK ; break condition
You'll find more information in the inline documentation of the source of the program hardcopy.lst. The byte just in work on the output device will be inverted on the screen like a cursor. You can see the output progress by the inverted character on the screen. Download all descriptions and the software including the source code ( 33 Kbytes ). |
|||||||||||||||||||||||||||||||||||||||


