Sharp logo

Willy's MZ-800 Monitor 
General

Willy's MZ-800 Monitor without a floppy interface

Willy's MZ-800 Monitor with floppy interface

This is a powerful monitor for the MZ-800 which has a lot of additional functions, commands, and high expanded routines. It replaces the MZ-800 monitor ROM 9Z-504M and the monitor is compatible to the monitor 9Z-504M except that it does not support any Quick Disk drive. The routines for the QD are replaced by routines which support up to 4 floppy drives.

You can use this monitor in your MZ-800 or in emulators by replacing the ROM-file(s). If you want to use it in your MZ-800 you have to download the binary ROM-contents for this monitor and to burn a 16 kb ROM which then replaces the original MZ-800 ROM.

The most of the monitor messages are in German but will be explained in detail later on this page. A next version will exclusively use English messages.

Monitor Functions

  • You can load, execute, or copy disk files even the master file or a complete disk. Up to 4 floppy drives are supported. CP/M disks are not supported.

  • You can format a disk.

  • You can set a file as the Master which will be automatically executed by booting.

  • You can speed up the load of your tape programs by setting the speed to "rapid". This takes the half of the normal tape load time and tape usage.

  • You can process all memory areas directly; e.g. CG-ROM, V-RAM, program RAM.

  • You get several new functions and commands to: compare, search, input text, read / write RAM-card, use the printer, and others. ASCII and Sharp ASCII are supported.
Installation


There are six files available for download. Three files of them can be used by an emulator, the other three files are for the usage by an MZ-800.

The three files for the usage by an emulator are split into three files: the CG-ROM, the MZ-700 monitor, and the MZ-800 monitor. Use the setup options to install these ROMs into your MZ-800 emulator.

The three files for the usage by an MZ-800 are not split. They contain the MZ-800 ROM in a single binary file structured like the original MZ-800 ROM. May be, you have an emulator which uses this kind of ROM. In this case the single file can also be used for emulation. Use the setup options to install this ROM into your MZ-800 emulator.

The structure of this ROM is as follows:
$0000 - $0FFF MZ-700 monitor ROM 1Z013B. This part is changed. It contains new monitor functions.
$1000 - $1FFF both character sets ( 1st character set from $1000 to $17FF, 2nd character set from $1800 to $1FFF ),
$2000 - $3FFF MZ-800 monitor ROM ( IPL, floppy disk routines ). This part is changed. It contains new monitor functions.

The German versions display the MZ-800 messages in German and they use the European character set.
The European versions display the MZ-800 messages in English and they use the European character set.
The Japanes versions display the MZ-800 messages in English and they use the Japanese character set.

If you want to use the monitor by an emulator then download:

the German version
( German messages, European character set, ZIP; 13 kb ) or

the European version
( English messages, European character set, ZIP; 13 kb ) or

the Japanese version
( English messages, Japanese character set, ZIP; 12 kb ).


If you want to burn a ROM for your MZ-800 then download:

the binary contents of the German ROM 16 kb
( German messages, European character set, ZIP-file; 13 kb ) or

the binary contents of the European ROM 16 kb
( English messages, European character set, ZIP-file; 13 kb ) or

the binary contents of the Japanese ROM 16 kb
( English messages, Japanese character set, ZIP-file; 12 kb ).


Unzip the file. Use it for an MZ-800 emulator directly if possible and / or burn the binary contents into a new 16 kb ROM by an Eprommer.

Now you have to replace your MZ-800 ROM 9Z-504M by the new ROM. Proceed as described:

  • Unplug all cables from the MZ-800.

  • The MZ-800 must be opened. To this remove its screws:

    5 screws at the rear, 3 at the bottom, 2 of the cassette recorder or its cover ( MZ-811 only ), 2 under the I/O cabinet unit and the recorder or its cover. Disconnect the recorder if you have such device and disconnect the I/O cabinet unit. Now remove the MZ-800 cover.

    Now remove carefully the ROM chip signed as 8C 27128K-3 at the board by using a screw driver. Put the new ROM chip into the socket. Pay attention to the notch at the chip and don't damage the pins of it while inserting.
    Part of the MZ-800 board
    The notch must be positioned as shown on the board
    ( points to the left on this picture ).
Additional information


To get a good compatibility the new monitor is imbedded into the known monitor as well as possible. All QD commands are deleted and replaced by floppy routines.

A program to be executed within the address range $0000 to $1200 will be executed correctly. AUTO RUN will be executed correctly too by informing the BASIC from which drive the BASIC was loaded. To this the registers B and C will be set.

The monitor exclusively uses the following areas:

- $1080 - $11FF ( stack / work )
- $1200 - $2FFF ( if FORMAT is active )
- $CEE7 - $E7FF ( floppy control )

The area $CEE6 - $E7FF is used for the data of the file in work, the allocation table, the boot track, and the directory.

Take care if you change files of the type BSD or BRD. In this case errors may occur, because these types are not written in a single block like the file types OBJ and BTX.

The floppy routines are stored in the MZ-700 ROM up from location $0070 and they use RAM memory for the boot track and the directory up from location $D000.

Default settings after boot:

- MZ-700 mode
- ROM areas active: $0000 - $0FFF, $E010 - $FFFF
- Display RAM $D000 - $DFFF
- Sharp ASCII
- Printer off

The monitor is executed immediately if you press "M" at power on.

Commands


Willy's MZ-800 Monitor without a floppy interface

Commands are executed directly ( CR is not required ).

Use F to boot from the floppy drive ( no floppy interface was activated for the screenshot shown above ).

Use C to load a file from the CMT ( tape / data recorder ).

Use R to load a file from the CMT which was saved by "R" ( higher density ).

Use "M" to invoke the monitor. The following commands are available:

command function
1, 2, 3, 4 Selects the floppy disk drive.
You are prompted to select a subcommand ( see below ).
The monitor can use the area $1200 - $CEE5.

1C
2C
3C
4C

Copy disk ( 320 kb / 80 tracks / 40 kb ). Ignore error(s) for Sharp disks, because these use 70 tracks only.
The usage of the same drive is possible for read and write.
Start and target tracks are displayed while copying.
Use the break key if desired.

1D
2D
3D
4D

Displays the directory.
The information displayed are:
Typ ( M = master, 1 = OBJ etc. )
File name
Load address ( "from" ),
Load end address ( last byte is at "to" )
Execution address ( "exec" ),
Start of track / sector on disk ( "TrkS" )
Use the Space key to stop if desired.

1E
2E
3E
4E

ERASE
Deletes one or more file(s)
You can select each file for DELETE
"delete Y/N "Y" deletes, "N" skips this file and lets select the next file.
OK? Y/N", "Y" stops, "N" once more or next disk ( if you exchange the current disc for another disc )
Use the break key if desired .
1F
2F
3F
4F
FORMAT a disk ( 80 tracks, 314 kb free from track 1 sector 8 )
OK? Y/N use "N" to stop immediately or use "Y" to start the format, "trackNo." shows the track number which is in progress
Restart the FORMAT function if any read error occurs.
If the error persists do not longer use the disc ( recycle the disc ).
Use the break key if desired.
1I
2I
3I
4I
INIT a disk. This function deletes the directory.
Disk delete Y/N: "Y" deletes the directory, "N" breaks this function immediately
1K
2K
3K
4K
Copy a file to any disk.
A copy of the master file to a non-master file is possible.
You are prompted for each file:
"copy Y/N:". "Y" will copy this file. "N" will skip this file ( no copy ).
You are promped for the target drive ( "to drive" ) if "Y" was selected.
1L
2L
3L
4L

LOAD a file
Each OBJ-file on the disk will be displayed to select it for LOAD:
"load Y/N: ". "Y" will load the file.
You will be prompted for the address where the file shall be stored into the memory ( "at" ).
Use the break key if desired.

1M
2M
3M
4M
You can set a file to a master file ( for OBJ-file(s) only ).
The file will be copied into the boot sector and its name is truncated to 12 characters.
The directory entry of this file is set to the file attribute $80 ( = deleted / invalid entry )
1R
2R
3R
4R
RUN a OBJ-file or the master file.
You get displayed step by step all existing OBJ-files to select one for RUN.
"start Y/N: ", "Y" will execute the OBJ-file, "N" skips to display the next file.
Use the break key if desired.
1S
2S
3S
4S
SAVE an OBJ-file beginning from RAM address $1200 or higher.
E.g. you can load and modify a BASIC then SAVE it with original addresses. Serve the following prompts:
"File name"
"Orig. Topadr.: " ( Load address for the header )
"Execaddr: " ( execution / auto start address )
"RAM frm " will be the address of the first byte in the MZ-800 RAM. All is saved from this address up to the value you input at the next prompt: "to".
The last two values will be computed to the length of the file.
Example: You can save a file from RAM $1200 ( by using the prompt "RAM frm " ) but you can set the load address different to e.g. $5000 ( by using the prompt "Orig. Topadr.: " ) for the next load.
1T
2T
3T
4T
Reads from track / sector.
You are prompted to type in the address:
"Read frm track 00..4F: "
"Sector 00..0F "
The next 2 prompts "frm" and "to" are the RAM memory addresses where the data read from the disk are to be stored.
1W
2W
3W
4W
Writes to track / sector. Data and address is selectable by a prompt.
"Write to track 00..4F: "
"Sector 00..0F "
The next 2 prompts "frm" and "to" are the RAM memory addresses where the data to be written to the disc locates in the RAM.
B BELL on / off. A short beep tone can be activated if you press a key.
C The memory area selected by the prompts "frm" and "to" will be displayed in the character mode.
D DUMP memory area selected by the prompts "frm" and "to"
Stop scrolling by the space key.
Use the break key if desired.
E EXIT to BASIC
F Boot like doing by the Reset Key, but you will be prompted to do ( "OK? Y/N" )
G GOSUB / GOTO will execute a program in the memory ( works like "J" of the original MZ-800 monitor )
H Turns on the sound to be able to hear the noises from tape.
I The function IN reads an area from the RAM card ( without the directory ) into a specified MZ-800 RAM area.
The MZ-800 RAM area can be defined by a start start address ( "RAM frm " ) and an end address ( "to " ). "RamCardAdr" is the memory address of the RAM card which is to be read.
Data from the RAM card ( RamCardAdr ) will be read and copied to the MZ-800 RAM area specified by "RAM frm " / "to ".
J

JUMP "to "...
Example: The commands "R J 0000" will restart BASIC if loaded. "R" is a prefix ( read details about prefixes ).

L LOAD from tape. For more details take a look at the example below.
Use the break key if desired.
M Modify memory.
You are prompted for the first address ( "at" ).
You can use the cursor keys right to skip the current address and left to go to the previous address ( e.g. to do corrections ).
Use the break key to stop.
O OUT writes an area from the MZ-800 RAM into the RAM card.
"RAM frm " is the prompt for the first byte of the MZ-800 RAM area
" to " is the prompt for the last byte of the MZ-800 RAM area
"RamCardAdr" is the prompt for the memory address of the RAM card.
Data from the MZ-800 RAM will be read from the area specified by the prompts "RAM frm " and " to " and copied to the RAM card as specified by the prompt "RamCardAdr".
Q Changes the border color by each pressing of "Q".
S SAVE to tape.
You have to serve the following prompts:
File name
"Orig. Topadr.: " ( Load address for the header )
"Execaddr: " ( execution / auto start address )
"RAM frm " ( address of the first byte of the RAM area to be saved )
" to " ( address of the last byte of the RAM area to be saved )
T the last two values will be computed to the length of the file.
"Verify: Tape ready? OK? Y/N" ( Use "Y" if the tape is ready for VERIFY, use "N" to stop the process. )
T Transfer memory areas to a specified new memory area.
Transfers the area beginnning at "frm" and ending at " to " into the memory area starting at "into ".
Data from ( "frm" ) to ( "to" ) will be copied to ( "into" ).
U Compares two memory areas.
The area beginning at "frm" and ending at " to " is compared with the area beginning at "with". The differences of the 1st area will be displayed.
V Verify 4 bytes of data of a specified memory area.
"frm" = 1st byte of the memory area
" to " = last byte of the memory area.
You can use a joker by using the <CR> key.
The location of the data found will be displayed.
W Writes text to a specified memory area.
Use the <CR> key to close your input. The data will be written to the address which you can specify by the prompt "at ".
X Transfers CG-RAM / ROM.
The CG-ROM area $1000 - $1FFF and the CG-RAM area $C000 - $CFFF are activated by this command !
E.G. using "X frm 1800 to 18FF into C000" activates the 2nd character set.
"into" is the address of the first byte of the 2nd area ( which receives the bytes from the 1st area ).
Y Computes the sum and the difference of two specified hexadecimal values.
You're prompted for OP1 and OP2.
Z Fill a memory area with a specified hex character.
You're prompted for "frm", " to ", and "Data" ( hex ).

Command Prefixes ( can be used with commands C...Z only )
Prefix Function
A ASCII: All data of texts are assumed to be ASCII.
Example: You can display ASCII texts of the memory by using the commands "A C" ( "frm" " to " ).
P Normally all data is written to the screen only. If using "P" the data is written also to the printer.
R RAM from $0000 to $FFFF. You have access to the complete RAM.
If you use the commands L or S / Rapid ( Load or Save / Rapid ) you only have access to $1200 - $CFFF. If you use floppy commands you only have access to $1200 - $FFFF.

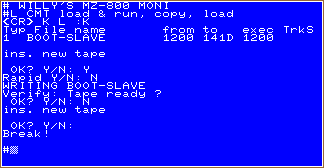
Example of using the load command "L":

If you type in "L" ( LOAD ) while in the monitor ( invoked by "M" ) then you'll be asked for "<CR> K L:".

command function
<CR> Loads and executes a file from tape.
L Loads the file without execution.
You'll be prompted for the load address. The file will be loaded into the memory beginning from this address.
K Copies a file ( see details below )

If you copy a file ( command K of the prompt "<CR> K L" ) you will have to start the data recorder first. If a file is found the tape header information will be displayed. In the example above:
"Typ" = 0 ( i.e. machine code )
"File name" ( i.e. BOOT-SLAVE )
"from" ( load address i.e. $1200 )
" to " ( address of file end / last byte; i.e.$1D00 )
"exec" = execution address ( i.e. $1203 )

If the load process has completed you'll be prompted to exchange the cassette ( "ins. new tape" ) with a new one for the copy. Type in "Y" at the prompt "OK? Y/N: " if the new tape is ready. Choose "Y" at the prompt "Rapid Y/N: " if you want to use double speed ( > 1200 baud ) otherwise choose "N" for normal speed. Now the file will be copied to the new tape and the message "WRITING..." appears.

When the copy process has completed you can let verify the file ( "Verify: Tape ready?" ). In this case you have to rewind the tape to the start position of this file and next type in "Y" at the prompt "OK? Y/N: " otherwise "N". Use the Break Key to stop the process, but otherwise you can copy again by typing in "Y" at the prompt "OK? Y/N" and the procedure described above restarts.

A full description of all monitor subroutines and the data areas used will follow next.


Go to the top of this page Home

last updated November 15, 2002
sharpmz@sharpmz.org

The MZ-800 ROM which is to replace by Willy's Monitor ROM